| MATLAB Installation Guide for Unix | |
Installation Procedure
This section details the step-by-step procedure you use to install the MathWorks products and documentation on your UNIX workstation. Table 1-1, Summary of Installation Procedure lists each step.
Depending on which products you purchased, you may need to repeat this procedure with the other CDs in the set. When you repeat this procedure, you can start at Step 5. (On some systems, you may need to mount each CD.) If you encounter any problems during the installation process, refer to Troubleshooting.
| Perform the pre-installation tasks described in Before You Install |
| Step 1: Log in to your system |
| Step 2: Mount your CD-ROM drive |
| Step 3: Create the installation directory |
| Step 4: Put your License File in the installation directory |
| Step 5: Run the installation script |
| Step 6: Review the license agreement |
| Step 7: Verify the installation directory name |
| Step 8: Verify your License File |
| Step 9: Specify the products and documentation to install |
| Step 10: Specify location of symbolic links |
| Step 11: Begin the installation |
| Step 12: Exit the installer |
| Perform the post-installation tasks described in After You Install |
Step 1: Log In to Your System
Superuser status is required to install the symbolic links that add MATLAB to your users' paths and to edit the system boot script to start the MATLAB license manager automatically at system boot time. If you do not have superuser status, you can still install MATLAB, but MATLAB programs must be invoked using absolute pathnames. You can also set up these links after the installation is complete.
| Note If you have superuser status and you are performing an installation for another user, you will need to update the license options file after the installation is complete. See Setting Up Network Named User Licensing for information about updating the installation options file. |
Step 2: Mount Your CD-ROM Drive
Mount the CD-ROM drive you intend to use to install MATLAB, following these instructions. (If your system does not require mounting the CD-ROM drive or if you have downloaded your products from the MathWorks Web site, skip ahead to Step 3.)
Step 3: Create the Installation Directory
Create the installation directory and move to it, using the cd command. For example, to install into the location /usr/local/matlab6p5, use these commands.
You can specify any name for the installation directory. However, do not specify a directory name that contains spaces, an at (@) sign, or a dollar ($) sign. Also, do not include a directory named private as part of the installation path. Subsequent instructions in this book refer to this directory as $MATLAB.
Step 4: Put Your License File in the Installation Directory
Move your License File, named license.dat, into the $MATLAB directory. For more information about license files, see Creating a License File.
The installer looks for the License File in the $MATLAB directory and, after processing it, moves the License File to $MATLAB/etc during installation.
Upgrade Installations. If you are upgrading an existing MATLAB installation, rename the License File in $MATLAB/etc. The installer will not process the new license file if it finds an existing license file in $MATLAB/etc.
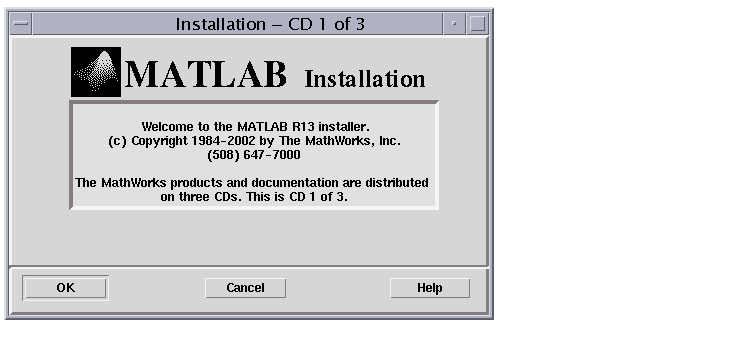
Step 5: Run the Installation Script
Run the installation script appropriate for your platform.
The installation script displays the following welcome screen.
Step 6: Review the License Agreement
Accept or reject the software licensing agreement displayed. If you accept the terms of the agreement, you may proceed with the installation.
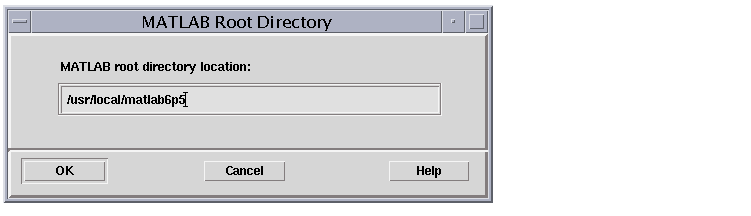
Step 7: Verify the Installation Directory Name
Verify the name of the installation directory in the MATLAB Root Directory dialog box and then click OK to continue. If you specify a directory that does not exist, the installer creates it.
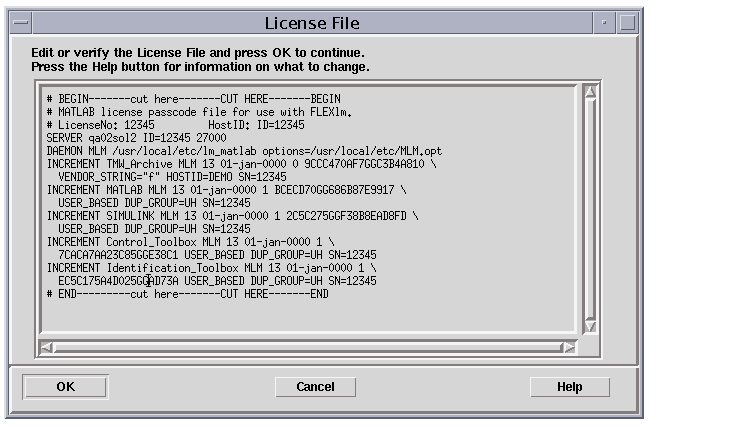
Step 8: Verify Your License File
Verify your License File in the License File dialog box and click OK.
Note
If you didn't put a copy of your License File in your $MATLAB directory, the installer displays a License File template. You can modify this template to create a valid License File.
|
When verifying your License File:
INCREMENT line match the license information you received from The MathWorks.
INCREMENT lines to wrap. You must use the continuation character (\) if INCREMENT lines get too long to fit on one line. Do not use tabs to separate the fields in an INCREMENT line.
You can edit the License File in the text window displayed. If you want to use another text editor, click Cancel. Make sure you edit the processed version of the License File, $MATLAB/etc/license.dat, not the version of the License File you placed in the top-level installation directory in Step 4.
Step 9: Specify the Products and Documentation to Install
Specify the products and documentation you want to install in the Installation Options dialog box and then click OK to continue.
This dialog box lists all the products and documentation available on the CD that you are licensed to install. If you do not want to install an item in this list, select it and click the Remove button. (A MATLAB installation includes MATLAB, the MATLAB Toolbox, and the MATLAB Kernel.)
Select any additional platforms needed at your site from the column of check boxes. For information about which HP platform option to choose, HP-700 or HP-UX, see Additional System Requirement Notes.
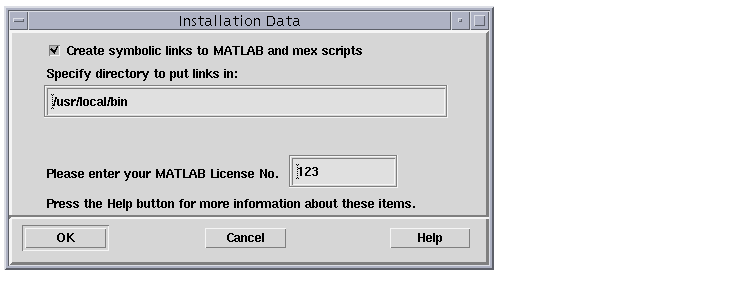
Step 10: Specify Location of Symbolic Links
Specify where you want to put symbolic links to the matlab and mex scripts in the Installation Data dialog box. Choose a directory such as /usr/local/bin that is common to all your users' paths. The installer fills in the License Number automatically. Click OK to continue with the installation.
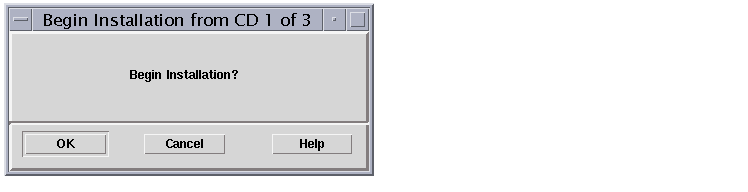
Step 11: Begin the Installation
The installer displays the Begin Installation dialog box. Click OK to begin the installation.
The installer displays a dialog box indicating the progress of the installation.
Step 12: Exit the Installer
After the installation is complete, the installer displays the Installation Complete dialog box, assuming your installation is successful. This dialog box informs you of some optional post-installation setup and configuration steps you may want to perform. See After You Install for more information. Click Exit to dismiss the installer.
| Note Depending upon which products you are licensed to install, you may need to repeat the installation procedure with the other CDs in the set. |
| | Installing MATLAB | Installing MATLAB on a Client System | |