

| Graphics | |
How to Print or Export
This section covers the following topics to show you the steps you need to take to produce a printed or exported figure:
Before you print or export a figure, preview the image to be exported by selecting Print Preview from the figure window's File menu. Use the Page Setup dialog box or the set function to adjust the look of the exported figure. See Changing a Figure's Settings for details.
This section tells you how to print your figure to a printer:
Using the Graphical User Interface on Windows
MATLAB for Windows uses the standard Windows Print dialog box, which normally comes with Windows software products. To open the Windows Print dialog box, select Print from the figure window's File menu.
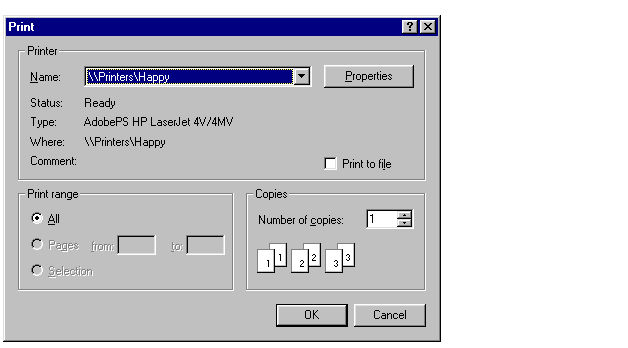
Settings you can change in the Windows Print dialog box are as follows:
Properties. To make changes to settings specific to a printer, click the Properties button. This opens the Windows Document Properties window.
Print range. You can only select All in this panel. The selection does not affect your printed output.
Copies. Enter the number of copies you want to print.
Using the Graphical User Interface on UNIX
MATLAB for UNIX has a Print dialog box and an associated Printing Options dialog box. To open the Print dialog box, select Print from the figure window's File menu.
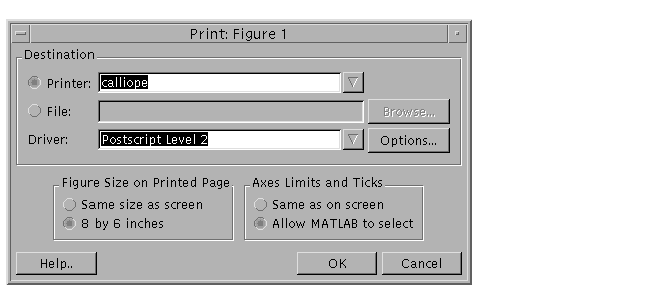
Settings you can change in the UNIX Print dialog box are as follows:
Figure Size on Printed Page. If you want the printed plot to have the same size as it does on your screen, select Same size as screen. If you want the printed output to have the default size of 8-by-6 inches, select 8 by 6 inches.
See Setting the Figure Size and Position for more information.
Axes Limits and Ticks. To force MATLAB to print the same number of ticks and the same limit values for the axes as are used on the screen, select Same as on screen. To let MATLAB scale the limits and ticks of the axes based on the size of the printed figure, select Allow MATLAB to select.
See Setting the Axes Ticks and Limits for more information.
UNIX Printing Options Dialog Box
To open the UNIX Printing Options dialog box, click the Options button on the UNIX Print dialog box (see figure shown above).
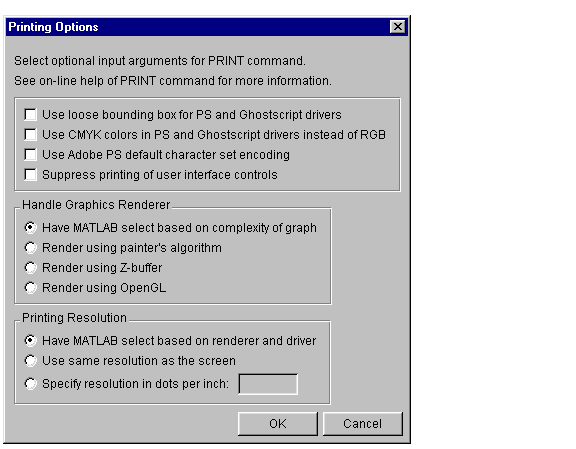
Settings you can change in the Printing Options dialog box are as follows:
Use loose bounding box for PS and Ghostscript drivers. Select this box to leave a little space between the outermost objects in the plot and the edges of the plot's background.
Use CMYK colors in PS and Ghostscript drivers instead of RGB. Select this box to produce output in CMYK (cyan, magenta, yellow, black) color space instead of RGB (red, green blue). This is for PostScript printers and drivers only.
Use Adobe PS default character set encoding. Select this box to have MATLAB use the default character set that is supported by all PostScript printers. This option is provided because some early PostScript printers do not support the PostScript operator ISOLatin1Encoding, which MATLAB uses when it generates PostScript files. If your printer does not support this operator, you may notice problems in the text of MATLAB printouts.
Suppress printing of user interface controls. Select this box to prevent any user interface controls that you added to the plot from appearing in the printed plot.
Handle Graphics Renderer. Select one of the radio buttons to have MATLAB select the renderer, or to select a specific renderer from those that MATLAB supports. See The Default Renderer for MATLAB for information on how MATLAB selects a renderer.
Printing Resolution. Select one of the radio buttons to either have MATLAB select the resolution for your printout, to set the resolution to that used for the screen display, or to enter a specific resolution value. See Default Resolution and When You Can Change It for information on how MATLAB selects a resolution setting.
Use the print function to print from the MATLAB command line or from a program. See Printing and Exporting with print for more information.
To send the current or most recently active figure to a printer, simply type
The Printing Options table on the print reference page shows a full list of options that you can use with the print function. For example, the following command prints Figure No. 2 with 600 dpi resolution, using the Canon BubbleJet BJ200 printer driver:
| | Default Settings and How to Change Them | Printing to a File | |