| Development Environment | |
Using the Import Wizard with Text Data
To import text data using the Import Wizard, perform these steps:
uiimport function to start the Import Wizard.
Specifying the Delimiter
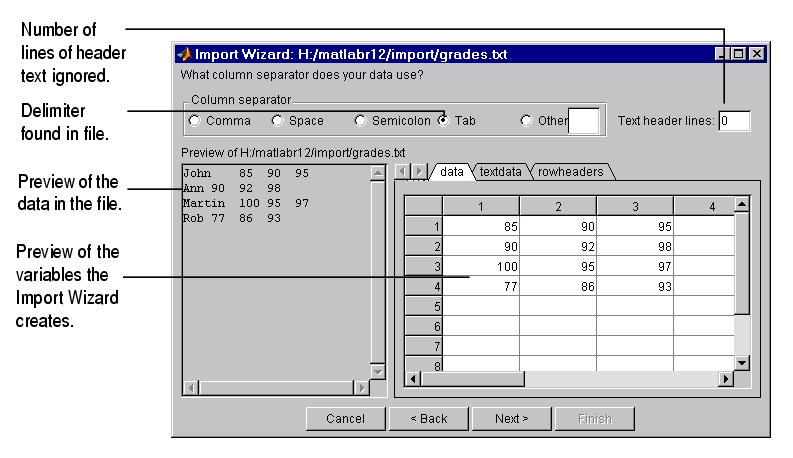
When the Import Wizard opens a text file, or copies data from the clipboard, it displays a portion of the raw data in the preview pane of the dialog box. You can use this display to verify that the file contains the data you expected.
The Import Wizard also attempts to process the data, identifying the delimiter used in the data. The Import Wizard displays the variables it has created based on its interpretation of the delimiter, using tabbed panels to display multiple variables.
For example, in the following figure, the Import Wizard has opened this sample file, grades.txt.
In the figure, note how the Import Wizard has correctly identified the tab character as the delimiter used in the file and has created three variables from the data:
data contains all the numeric data in the file.
textdata contains all the text found in the file.
rowheaders contains the names in the left-most column of data.
Handling Alphabetic Data. The Import Wizard recognizes data files that use row or column headers and extracts these headers into separate variables. It can also ignore any text header lines that might precede the data in a file.
Specifying Other Delimiters. If the Import Wizard cannot determine the delimiter used in the data, it displays a preview of the raw data, as before, but the variables it displays are not correct. If your data uses a character other than a comma, space, tab, or semicolon as a delimiter, you must specify it by clicking the Other button and entering the character in the text box. The Import Wizard immediately reprocesses the data, displaying the new variables it creates.
Selecting the Variables to Import
The Import Wizard displays a list of the variables it has created from your data. To select a variable to import, click in the check box next to its name. By default, all variables are selected.
The Import Wizard displays the contents of the variable that is highlighted in the list in the right pane of the dialog box. To view the contents of one of the other variables, click it. Choose the variables you want to import and click Next.
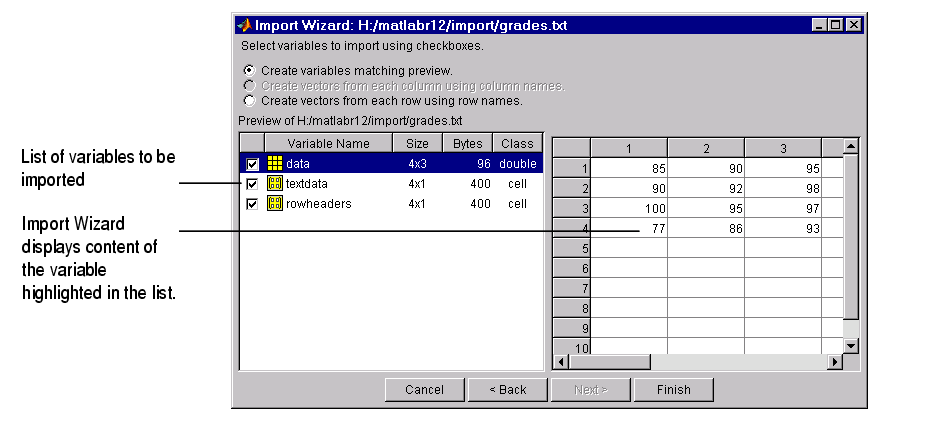
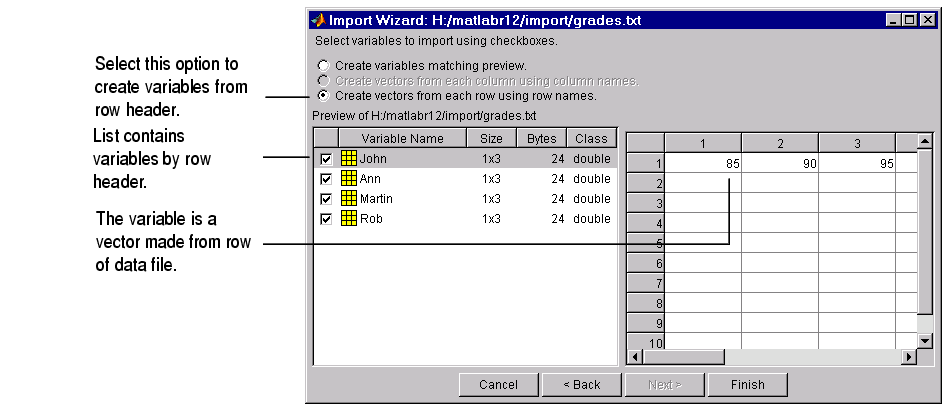
Changing the Variable Selection. By default, the Import Wizard puts all the numeric data in the file into one variable. If the file contains text data, the Import Wizard puts it in a separate variable. If the file contains row or column headers, the Import Wizard puts them in separate variables, called rowheaders or colheaders, respectively.
In some cases, it might be more convenient to create a variable from each row or column of data and use the row header or column header text as the name of each variable. To do this, click the appropriate button from the list of buttons at the top of the dialog box.
For example, it eases calculation of the student averages if you create a separate variable for each student, which contains that student's grades. To create these variables, click the Create variables from each column using row names button. When you click this option, the Import Wizard reprocesses the file, creating these new variables.
When you are satisfied with the list of variables to be imported, click Next to bring the data into the MATLAB workspace. This button also dismisses the Import Wizard. The Import Wizard displays a message in the MATLAB Command Window, reporting that it created variables in the workspace. In the following example, note how the numeric text data in each variable is imported as an array of doubles.
Import Wizard created variables in the current workspace.
>> whos
  Name         Size         Bytes  Class

  Ann          1x3             24  double array
  John         1x3             24  double array
  Martin       1x3             24  double array
  Rob          1x3             24  double array

Grand total is 12 elements using 96 bytes
| | Importing Text Data | Using Import Functions with Text Data | |