Printing Block Diagrams with Print Frames
When using Simulink or Stateflow, you can print a block diagram with the print frame.
- 1
- Select Print from the Simulink or Stateflow File menu.
- The Print Model dialog box appears. The dialog box shown below is for the
Windows platform. The dialog box for your platform might look slightly
different.
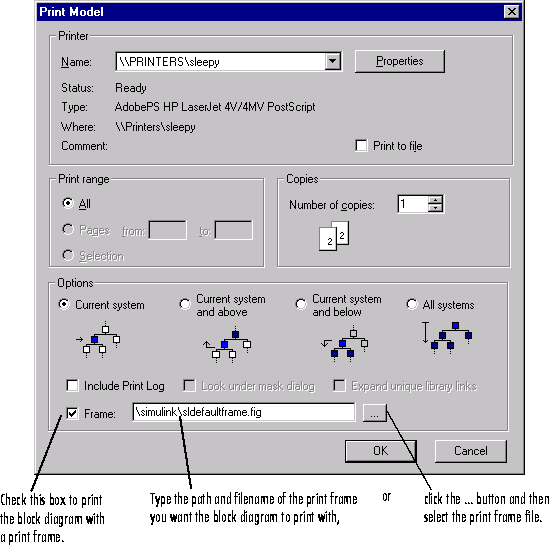
In the Print Model dialog box:
- 1
- Check the Frame checkbox.
- 2
- Supply the filename for the print frame you want to use. Either type the
path and filename directly in the edit box, or click the ... button and select
the print frame file you saved using the PrintFrame Editor.
- Note that the default print frame filename,
sldefaultframe.fig, appears in
the filename edit box until you specify a different filename.
- 3
- Specify other printing options in the Print dialog box. For example, for
Windows, specify options under Properties.
Note:
Specify the paper orientation for printing the way you normally would. The paper orientation you specified in the PrintFrame Editor's PrintFrame Page Setup dialog box is not the same as the paper orientation used for printing. For example, assume you specified a landscape-oriented print frame in the PrintFrame Editor. If you want the printed page to have a landscape orientation, you must specify that at the time of printing. For example, for Windows, click the Properties button in the Simulink or Stateflow Print Model dialog box, and for Page Setup, specify the Orientation as Landscape.
- 4
- Click OK in the Print dialog box.
- The block diagram prints with the print frame you specified.
See also the example, Print the Block Diagram with the Print Frame.
[ Previous | Help Desk | Next ]